T-post fire-wood rack
I'll start off by saying:
1. NEVER LEAVE DEAD UN-TREATED WOOD ON THE GROUND!
To do so is an invitation to wood eating pests, and rot.
And also:
2. GET FIRE-WOOD FROM NEAR WHERE YOU ARE GOING TO USE IT!
This is the best way to prevent spreading tree pests and diseases,
especially if the wood in question is from a dead tree.
And Finally
3. If by fallowing these instructions you, hurt anyone, damage any property,
or tear a hole in time and get sucked back to the dark ages to battle the
undead, its your problem not mine.
But if you do happen to do the last one I would love to hear about it.
OK, with that little rant done shall we begin?
Step 1:
Pick a spot for the rack.
It should be somewhere:
with full sun.
near, but not next to, where its going to be used.
and away from children / pets / any irresponsible persons
and (duh) away from sparks, open flame, etc.
Step 2:
the next step is to call your local Diggers Hotline or your utilities which
ever your state requires to make sure that your not going to hit anything
nasty under ground (or at least to cover your ass if you do).
BTW we'll be going about a foot under ground (below grade).
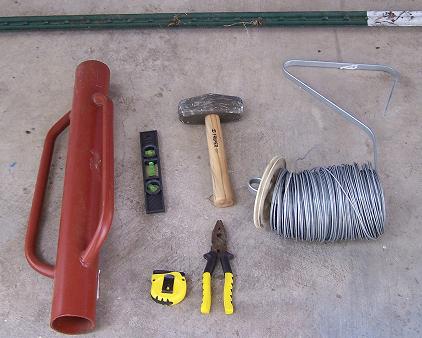
Materials:
6 T-posts (some where in the 4ft to 6ft range) for the first section
4 T-posts for each section in the same row there after
Wire - about 5ft for the first section 2.5ft there after
About 12- 14 gauge wire or coat hanger wire.
lighter wire can be used but would require more passes around the
T-posts, figure accordingly.
Tools:
4lb sledge hammer (short handle)
pliers / wire cutters
tape measure (optional)
level (optional)
post pounder (optional)
 A side note, not all T-posts listed as the same size are the same size.
For this project this is only a problem horizontals.
A side note, not all T-posts listed as the same size are the same size.
For this project this is only a problem horizontals.
 Step 3:
Place the first post in the corner starting location of your wood rack.
Make sure you have room to walk / load and unload / mow around your wood rack.
T-posts can be removed, its not easy...
Step 4:
Aline the nub side of the t-post so that so that it is parallel to the
direction you wish your rack to go.
Step 3:
Place the first post in the corner starting location of your wood rack.
Make sure you have room to walk / load and unload / mow around your wood rack.
T-posts can be removed, its not easy...
Step 4:
Aline the nub side of the t-post so that so that it is parallel to the
direction you wish your rack to go.
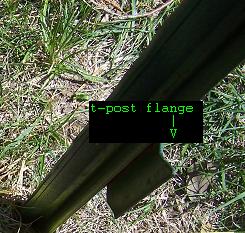
 Step 5:
Using the hammer drive the t-post in just far enough to hold it in the ground
use the level to make sure the t-post is vertical (or just eyeball it) then
drive the post until the flange is just under the ground.
Step 5:
Using the hammer drive the t-post in just far enough to hold it in the ground
use the level to make sure the t-post is vertical (or just eyeball it) then
drive the post until the flange is just under the ground.
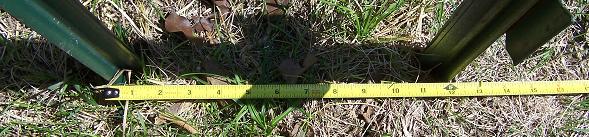
 Step 6:
Locate the 2nd t-post behind the first turned 180 deg from the 1st.
Personal I have 18" logs and put the posts 12" apart (as measured from the
top of the "T"s, do what works for you.
Step 6:
Locate the 2nd t-post behind the first turned 180 deg from the 1st.
Personal I have 18" logs and put the posts 12" apart (as measured from the
top of the "T"s, do what works for you.
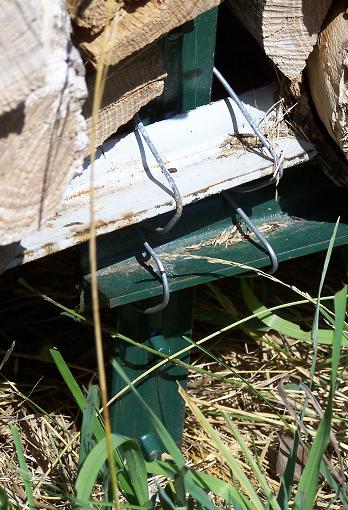
 Step 7:
The cleats on the horizontal posts can be removed if you want to but its
not really worth the trouble.
Put the horizontal posts between two nubs on the vertical apx. 10" off the ground.
Cut the wire in to a 15" section , fold it in half.
From underneath the horizontal post and behind the vertical, loop the ends
of the wire up over the horizontal and back behind the vertical.
Connect the horizontal posts to the vertical loosely.
The t-posts should nest together as such.
Step 7:
The cleats on the horizontal posts can be removed if you want to but its
not really worth the trouble.
Put the horizontal posts between two nubs on the vertical apx. 10" off the ground.
Cut the wire in to a 15" section , fold it in half.
From underneath the horizontal post and behind the vertical, loop the ends
of the wire up over the horizontal and back behind the vertical.
Connect the horizontal posts to the vertical loosely.
The t-posts should nest together as such.
 Step 8:
Line up the other vertical posts in the arc made by the last two full nubs on
the far end of the horizontal posts 10" off the ground, in the direction you
wish the rack to go.
Step 8:
Line up the other vertical posts in the arc made by the last two full nubs on
the far end of the horizontal posts 10" off the ground, in the direction you
wish the rack to go.
 Step 9:
Pound in the last two posts as done above.
Step 10:
Attach the posts as done above.
Step 11:
Tighten the wires by twisting the ends together.
Try to twist the wires so they are going around each other not just one going
around the other, as this can break the inside wire.
The posts should be firmly locked together now.
Step 9:
Pound in the last two posts as done above.
Step 10:
Attach the posts as done above.
Step 11:
Tighten the wires by twisting the ends together.
Try to twist the wires so they are going around each other not just one going
around the other, as this can break the inside wire.
The posts should be firmly locked together now.
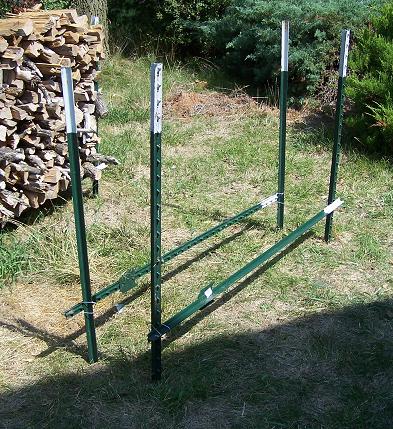 Step 12 (optional):
To extend the wood rack another section just attach the next pair of
horizontals just above or below the previous.
Step 12 (optional):
To extend the wood rack another section just attach the next pair of
horizontals just above or below the previous.
 Then do steps 7 to 11 again.
Questions, comments, rants, e-mail me dm_8088 "at" yahoo "dot" com.
Then do steps 7 to 11 again.
Questions, comments, rants, e-mail me dm_8088 "at" yahoo "dot" com.